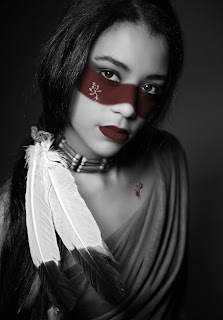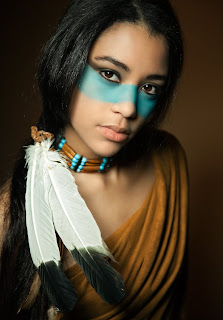

(Note: photoshop is needed!)
Hey i am back with another great tutorial. This time i'm going to talk about photoshop.
Were you always wondering how designers make such cool designs, and you wish you could make some nice designs too!? Alright no more worries, i am going to teach you a thing or two about photoshop.
Ofcourse i am going to start with the easy basic things, but later on it's going to be a lil bit more difficult.
We start with changing the colors in digital photo's. Sometimes you see designs that are black and white but the Tshirt is red, i will teach you how to do that.
First we need a picture. I downloaded a picture of this native american girl with blue war paint over her face. Now i want to change the color into red and make the rest black and white.
Open photoshop and go to File>open and select the picture. Now you will see the picture on your screen and as a small thumbnail in your layers palette (on the right side) called background.
Right click on that and choose duplicate layer. Now you have 2 layers. On the bottom of your layers palette you will see a square with a circle in it, click on it. Next to the background copy layer a blank frame appeared, we are going to work in that frame so select that frame.
Now press B on your keyboard and your arrow turns into a brush. Under edit you will see the word brush and a number, next to the number is a small triangle, click on it. Choose a soft brush, start with a normal size like 35 or 45. Make sure black is your foreground color (the black and white squares in the toolbar).
Click on the eye next to the original background layer to make that background disappear. Now only the background copy has the eye. Start brushing the parts that you want to alter. You will see that the parts you brush will go blank and that's good. Don't be affraid to go overboard a lil bit, you can fix that later with the white paintbrush.
Now put the eye back on the original background and select that layer (it has a blue stroke when it's selected). Click on the black and white circle (it's next to the mask tool we used earlier) and choose hue/saturation. Above the layer palette the hue/saturation adjustments appeared. Select the box colorize. Now you can play around with the colors.
When you are done and you still see lines or spots, go back to the background copy and select the blank frame again. Now you can start fixing those spots or lines you missed with the same black brush. Maybe this time you need a smaller brush size. If you made some mistakes you can correct them with the white color. Just switch the white colored square in your toolbar to the front by pressing X on your keyboard. Black is for adding color and white is for erasing. And don't forget to work alot with the zoom tool, some parts are hard to brush and for those parts you need to zoom in.
So now we are almost done. Let's add some black and white. But first select the thumbnail next to the blank frame. Press shift+ctrl+U and voila, now you have your black and white design with colored parts
Don't forget to safe your file as pdf and jpeg. Maybe you want to brush some more later.
In my next blog i will teach you guys how to fuse pictures and make cool designs.
So please stay tuned for the next tutorial......


1 comment:
she is gorgeous!
scott_hotornot@yahoo.com
Post a Comment